Tuesday, March 27, 2012

What's Cooking This Week

Chorizo & Potato Savoury Frittata
I'm a couple of days late this week - to be honest, it's all a bit frantic here at the moment and I'm just counting down until Friday when school holidays start! 

I'm low in quite a few staples, so have to spend a few hours replenishing those this week.  It's well worth spending the time, so that when I need them they're just in the fridge or pantry, waiting for me.  I find that much easier to do than make them as I need them.  So, I'll have lots of little jars empty, ready for re-filling with:  vegetable stock paste, chicken stock paste, cashew butter, almond butter, plum jam, yellow curry paste and granuesli (from For Food's Sake) and virtual bacon dust (from In The Mix).

For the actual meals of the week, here's what we've got happening:-

Monday:  Baking: bread, replenishing essentials, coconut bars, Crio Energy Bars (from For Food's Sake again), bliss balls and cinnamon roll cookies.  Dinner:  Chorizo & Potato Savoury Frittata from For Food's Sake which has become a firm favourite in our house.  It's really tasty and moreish and perfect cold the next day!

Tuesday:  Butternut Curry Soup from For Food's Sake again.  (We're having a bit of a Food's Sake week, it would seem!)

Barley & Pumpkin Risotto

Thursday:  Fragrant fish curry with basmati rice (recipe to come!).  I'm also making a few batches of Sticky Date puddings for the Thermomix stall at Enrich on Friday and some Brioche du Careme for the boys' school teachers on Friday.

Friday:  Pulled Beef & Beer Pie (I'm still recipe testing this one - hopefully this will be the last time and then I can post the recipe.)

Saturday and Sunday:  I'm off to do a weekend cooking class with Jude Blereau, so Mr MLT is in charge.  There'll be leftover pie for Saturday night and, most likely, his signature dish - Omlette - on Sunday night.

So, that's what will be gracing our dinner plates this week.  I hope whatever you're having, it's delicious - feel free to share!

Happy Mixing,
Brooke.

Saturday, March 24, 2012

Oatmeal & Sultana Cookies

Oatmeal & Sultana Cookies
There's not much you can say about these.

1.  They taste good.

2.  They are super quick and easy.

Enough said!!!


Oatmeal & Sultana Cookies

Ingredients:-

*  150g butter
*  150g rapadura sugar
*  1 egg
*  5g vanilla essence
*  100g plain flour
*  25g spelt grain (or other grain of choice)
*  200g oats
*  1 tsp baking powder
*  160g sultanas

Preparation:-

1.  Grind grain down to a flour for 1 minute on speed 9.  Set aside.

2.  Preheat oven to 160°C.

Method:-

1.  If butter is hard, soften by mixing for 2 minutes at 37° on speed 2.

2.  Add sugar and mix for 10 seconds on speed 4.  Scrape down and repeat.


3.  Add egg and vanilla and mix for 5 seconds on speed 4.

4.  Add flour, ground spelt, oats and baking powder.  Mix on reverse for 5 seconds on speed 4.  Scrape down.

5.  Add sultanas and mix in, on reverse, for 10 seconds on speed 4.

Roll out teaspoonfuls of mixture and bake in oven for around 20 minutes.

Enjoy!

Monday, March 19, 2012

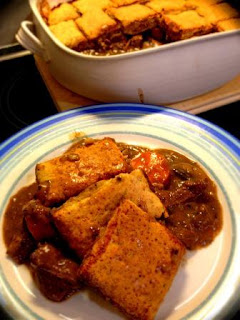
Rich Beef Casserole with Herb Scone Crust

Rich Beef Casserole with a Herb Scone Crust
Not a lot needs to be said about this dish.  It's easy, tasty and a crowd pleaser. 

It was supposed to last our family two nights but everyone went back for seconds and there were no leftovers to speak of - always a sign of a good meal!

If you don't have umami paste, you can susbtitute with vegetable stock.  I have to say though, Tenina's Umami Paste recipe is fabulous - make yourself a batch and you'll be surprised how quickly you go through it. 

If you have trouble sourcing the dulse for the paste, Organics Australia sell 50g for $6.95 which is great value.


Rich Beef Casserole with a Herb Scone Crust

Ingredients:-

Casserole:-

*  Handful parsley
*  4 cloves garlic
*  2 sticks celery
*  2 brown onions
*  15g Extra Virgin Olive Oil
*  2 carrots - chopped into 2cm thick rounds
*  15g cornflour
*  750g gravy beef - diced
*  150g mushrooms - sliced
*  1 tbs worcestershire sauce
*  1 tbs tamari
*  1tbs umami paste
*  1 tbs tomato paste
*  250g water

Herb Scones:-

*  40g parmesan
*  Handful of mixed fresh herbs: parsley, chives and oregano
*  300g SR flour
*  30g butter
*  180g milk (See Tip)

Preparation:-

1.  Pre-heat oven to 180C.

Method:-

Casserole:-

1.  Chop parsley for 4 seconds on speed 7 and set aside.

2.  Place garlic, onions and celery into TM bowl.  Chop for 2-3 seconds on speed 7.

3.  Add olive oil and cook for 5 minutes on Varoma temp on speed 1 (with MC off).

4.  Add parsley, carrot, cornflour, beef, mushroom, sauces, pastes and water.  Cook for 10 minutes, on reverse, at 100°, on speed 1.

5.  Pour into casserole dish.  Cover with lid or alfoil and cook in oven for 45 minutes.

While casserole is cooking, make herb scones.

Scones:-

1.  Grind parmesan for 8 seconds on speed 8.

2.  Add herbs and chop for 5 seconds on speed 7.

3.  Add SR flour & butter.  Mix for 5 seconds on speed 6, until mixture resembles breadcrumbs.


4.  Add milk & mix for 5 seconds on speed 5, until the mixture just comes together.   Knead for 30 seconds.

5.  Roll out onto non-stick mat and cut into squares.

6.  Once casserole has had it's initial 45 minutes of cooking, remove lid and place scone squares on top.  Cook, uncovered, for a further 30 minutes or until scones are beautiful and brown.

Serve with steamed greens and enjoy!

Tips:-

1.  If you have buttermilk, use buttermilk for the scones rather than milk - you'll get a lighter, higher result.

What's Cooking This Week

Chard, Mushroom & Rice Bake
Last week's menu plan never quite made it up onto the blog - by the time I got around to doing it we were half way through the week!

So, here's what's featuring on the menu at our place this week:-

Monday:  We were supposed to be having leftovers of the Rich Beef Casserole I made last night.  We ate it all though, so instead we're having Chicken & Navy Bean Soup.  Both recipes are coming to the blog this week.

 Tuesday:  It's parent teacher interview night and we have the ridiculous 5pm timeslot so that Paul can get there in time.  I'm making Chard & Mushroom bake during the day so that the kids can have it cold while we're out at school.  The leftovers will go in their lunchboxes, they love it and it saves me making sandwiches.

Wednesday:  I'm making Aush for the first time, which is an Afghan soup with noodles and vegetables, topped with ground lamb.  The recipe sounded so good, I had to try it.  The butcher was intrigued and very kindly cut my lamb leg into pieces so I could mince it easily, so I promised to take him some leftovers - he's still staggered that I use the Thermomix to make our own mince.

Thursday:  We're having Quirky Cooking's Sesame Salmon & Vegetables, which looks sensational!
Chicken & Vegetable Pie

Friday:  The boys are really struggling towards the end of the week now - they're tired and hanging out for Easter holidays (aren't we all).  Friday night dinners need to be quick and easily ingested for us, so we're going with Barley & Roast Pumpkin Risotto.

Saturday:  I have 6 demo's between Thursday and Sunday, so on Wednesday I'm going to make a Chicken & Vegetable pie and some Butternut Pumpkin Mac & Cheese to see Mr MLT through the weekend with the boys.  Defrost, throw in the oven and add vegies - instant meal.  He'll be happy, the boys will be happy and I'll be happy to have something waiting for me when I come home each day.

Carrot Slice
Baking:  The usual bread baking is going on, plus some school lunchbox treats:  Carrot Slice and Coconut Bread.

Hope you have a fabulous week!

Happy Mixing,
Brooke.

Chard, Mushroom & Rice Bake

Chard, Mushroom & Rice Bake
Next weekend I'm going to a cooking course hosted by the spectacularly fabulous, Jude Blereau.  To say I'm excited is an understatement.  I love Jude, her recipes and her food philosophy and just can't wait to meet her and learn as much as I possibly can from her.
This is one of my favourite of her recipes.  It's lovely cold, so we have it a lot in summer with salad.  It's also perfect for lunchbox fare.

There is a bit of faffing about at the beginning of this dish cooking the rice & amaranth, if you haven't already got some cooked.  I usually avoid this by making it the day after we've had rice for dinner one evening - the rice has already been soaked and cooked, so it saves having to go to the trouble for such a small amount.

Jude's original recipe also includes 1tsp amaranth in with the rice.  If I am cooking the rice specifically for this recipe, then I throw the amaranth or some quinoa in as well - it's great for adding that extra hit of protein.  If I'm just using leftover rice, I leave it out.


Chard, Mushroom & Rice Bake
(adapted from Jude Blereau's Wholefood for Children)

Ingredients:-

*  55g brown rice (or 3/4 cup cooked brown rice)
*  1 tsp amaranth or quinoa (see notes above)
*  1 tsp whey or lemon juice (for soaking)
*  10g olive oil
*  15g butter or ghee
*  1 onion
*  150g swiss brown mushrooms
*  2 cloves garlic
*  300g chard or silverbeet (stems removed, leaves washed and shredded)
*  70g parmesan - grated
*  2 tsp vegetable stock concentrate
*  250g ricotta
*  2 eggs
*  40g pine nuts

Preparation:-

The night before:-

If you aren't using cooked rice leftover from another recipe, then you will need to soak and cook the rice, as follows:-

1.  Soak rice, amaranth/quinoa and whey or lemon juice in a bowl of water overnight.

2.  Drain and rinse.  Place 700g of water in the TM bowl and the rice into the TM basket.  Cook the rice on Varoma temperature for 30 minutes on speed 2.  Set aside to cool.

On the day:-

1.  Pre-heat oven to 180°C.

2.  Place parmesan into TM bowl.  Grate for 8 seconds on speed 8.  Remove and set aside.

3.  Place pine nuts into TM bowl.  Lock the lid in the Closed Lid position and press the Turbo button once.  Set aside.

Method:-

1.  Place onion, garlic and mushrooms (see tip) into TM bowl.  Chop for 2 seconds on speed 5.

2.  Add butter and oil and saute for 4 minutes on 100°, on speed 1 (with MC removed).  Set aside with rice.

3.  Add chard and cook on reverse, for 2 minutes on 100°, on speed 1.

4.  Tip rice, onion mix and chard into a sieve and gently squeeze through excess liquid.  Tip into a separate mixing bowl.

5.  Add 50g reserved parmesan, ricotta, vegetable stock concentrate and eggs to TM bowl.  Mix for 5 seconds on speed 4.   (with MC removed).  Pour into mixing bowl containing chard mixture and gently stir through.

6.  Pour mixture into loaf tin.  Sprinkle with remaining parmesan and pine nuts and bake in 180°C oven for approximately 1 & 1/4 hours.

Delicious, hot or cold. 

Tips:-

I have a child who dislikes the texture of mushrooms, rather than the taste.  For this reason, I include the mushrooms in when I chop the onions, so that they end up small and he doesn't notice them.  The downside of this is that the mixture ends up quite grey.

If you don't need to "hide" the mushrooms, then just slice them by hand and include them with the chard step, rather than the onion.

Cook-A-Long with Brooke-A-Long: Edition 7

Over the coming months, Cook-A-Long is going to feature some basic recipes to help you replace some of the day to day items we use all the time - yoghurt, nut butters, sauces etc.

We're going to start a little differently though, with washing powder.  I've been using this now for about 2 months since a friend sent the recipe on and it's fabulous.  You can only make one batch at a time, so I just do several batches one after another and fill my tub.

I use white vinegar as my fabric conditioner, with a drop of lavender oil and a drop of eucalyptus oil.  Smells fabulous, works really well at removing stains and is a bundle cheaper. 

As always with Cook-A-Long, I really encourage you just to give it a go and see what you think.  Let me know if you try it out!


Thermomix Washing Powder


Ingredients:

1 bar Sunlight/Velvet soap - roughly chopped
1 bar Sard Wonder soap (or other stain removing soap) - roughly chopped
200g Borax

Method:

1.  Blitz soap for 5 seconds on speed 7.
2.  Add borax & soda and mix together for 10-20 seconds on speed 7.


Use 2 tablespoons full per load of washing.  Wash TM bowl well, then wash it again - just to be sure!

In terms of cost, it's about $5.50 per batch.  For our family, it's cheaper than what we were buying and is lasting much longer.


Saturday, March 17, 2012

Competition Time!

If you missed it in the MLT March Newsletter, you might not know that the first ever My Little Thermomix competition is off and running!

To enter, simply take a photo of your favourite Thermomix dish and email it to me, with recipe details.  Alternatively, you can post it straight onto the MLT Facebook Page.  You have until midnight, 30th March to show off your favourite recipe.

You can enter as many times as you want.  Every entry will be entered into a random draw and one lucky person will become the proud owner of a lunchbox size Thermomix cooler bag!  (I know, what more could you ever possibly want!)

Good luck, can't wait to see what everyone's favourites are!

Happy Mixing,
Brooke.

Wednesday, March 14, 2012

Cranberry Museli Bars - Two Ways

Cranberry Museli Slice - Traditional
I am fortunate in that my boys, touch wood, don't suffer from food allergies or intolerances.  (There was a brief episode of broccoli intolerance about 7 years ago, where hives emerged all over Jack's body and I drove to the GP with first time mother conviction that he had contracted some fatal tropical disease.)

I have friends, and obviously see a lot of families at demonstrations, who's children are on strict diets and for whom the repercussions of deviating from that diet are incredibly severe.  I am in awe of those parents who constantly find ways to make 5 ingredients look appetising night after night and who perservere in the hope that their little person outgrows the restrictions.

This week is Coeliac Awareness week.  In recognition of that, I've made two versions of this very delicious museli slice.  The first is for every Tom, Dick and Harry.  The second is a version that is (unless I've missed some gluten hiding in one of the ingredients) gluten free. 

Even if you aren't gluten free, the second version is definitely worth trying.  It's a nuttier taste and the quinoa really comes out in the flavour, but the tartness of the cranberries beautifully cuts through it. 

It is delicious warm, with a little custard on the side.  Pop the leftover slice in lunchboxes for a great school/work snack.

Enjoy.


Cranberry Museli Slice
(Traditional - Adapted from Eat Yourself Skinny)

Ingredients:-

Base:-

*  140g plain flour
*  100g rolled oats
*  90g rapadura sugar
*  1/4 tsp salt
*  1/4 tsp bi-carb soda
*  1/4 tsp ground cinnamon
*  100g butter
*  55g maple syrup

Filling:-

150g dried cranberries
*  100g sour cream, creme fraiche or natural yoghurt
*  60g rapadura sugar
*  30g plain flour
*  1 tsp vanilla extract
*  Rind of 1/2 an orange
*  1 large egg white

Topping:-

*  50g coconut flakes

Method:-


Preparation:-

1.  Pre-heat oven to 160C.

Base:-

1.  Add all ingredients to TM bowl.  Mix on Speed 6 for 10-15 seconds, until the mixture comes together.

2.  Set aside about 3/4 cup of the mixture. 

3.  Tip remainder onto a lined slice tin (mine measures 27cm x 16cm) and press down firmly to form base.

Filling:-

1.  Place orange rind in TM bowl.  Grind for 3 seconds on speed 8.

2.  Add all other filling ingredients.  Mix for 5 seconds on speed 5.

3.  Pour over slice base.

Topping:-

1.  Place reserved 3/4 cup of base mixture and coconut flakes into TM bowl.  Mix for 2 seconds on speed 5.

2.  Crumble over the top of the filling (try to cover as much of it as possible) and lightly press down.

Bake in 160C oven for approximately 40 minutes, or until golden and fragrant.


Cranberry Museli Slice - The GF Version
Cranberry Museli Slice
(Gluten Free)

Ingredients:-

Base:-

*  130g quinoa (see tip 2)
*  60g almonds (see tip 3)
*  60g coconut flakes
*  90g rapadura sugar
*  1/4 tsp salt
*  1/4 tsp bi-carb soda
*  1/4 tsp ground cinnamon
*  100g butter
*  55g maple syrup

Filling:-

150g dried cranberries
*  100g sour cream, creme fraiche or natural yoghurt
*  60g rapadura sugar
*  15g corn flour
*  1 tsp vanilla extract
*  Rind of 1/2 an orange
*  1 large egg white

Topping:-

 *  60g coconut flakes

Method:-


Preparation:-

1.  Pre-heat oven to 160C.

Base:-

1.  Place quinoa & nuts into TM bowl.  Grind for 1 minute on speed 8.

2.  Add all other ingredients to TM bowl.  Mix on Speed 6 for 10-15 seconds, until the mixture comes together.

3.  Set aside about 3/4 cup of the mixture. 

4.  Tip remainder onto a lined slice tin (mine measures 27cm x 16cm) and press down firmly to form base.

Filling:-

1.  Place orange rind in TM bowl.  Grind for 3 seconds on speed 8.

2.  Add all other filling ingredients.  Mix for 5 seconds on speed 5.

3.  Pour over slice base.

Topping:-

1.  Place reserved 3/4 cup of base mixture and coconut into TM bowl.  Mix for 2 seconds on speed 5.

2.  Crumble over the top of the filling (try to cover as much of it as possible) and lightly press down.

Bake in 160C oven for approximately 40 minutes, or until golden and fragrant.


Tips:-

1.  I actually make the topping mixture before I do the filling (it saves washing up the bowl in between).

2.  For the GF version, some people don't like the aftertaste of quinoa.  I actually quite like it, mixed with the cranberry, but if you want to cut it down - use 40g quinoa and 90g brown rice.

3.  If you need a nut free version, exchange the almonds with brown rice.


Monday, March 12, 2012

Lemon & Poppyseed Biscuits

Lemon & Poppyseed Biscuits
Salt & caramel.  Mint & chocolate.  Lime & Tequilla.  (I digress...)  Some flavours just work really well together and one of my favourites is definitely lemon & poppyseed. 

I'm not a big fan of grittiness in food (having passionfruit seeds in food is like listening to nails scrape down a blackboard for me).  Poppyseeds are fine enough though that I'm not bothered by their texture.

These biscuits are quick, easy and tasty.  What more could you want???


Lemon & Poppyseed Biscuits

Ingredients:

*  150g unsalted butter
*  200g rapadura
*  1 egg
*  300g plain flour (I usually use organic light sift)
*  1 tsp baking powder
*  2 tsp (5g) poppy seeds
*  Juice of 1 lemon

Method:

Ready to bake
1.  Preheat oven to 16 (fan forced).

2.  Place rapadura in TM bowl and mill for 4 seconds on speed 9.


3.  Add butter and mix for 5-10 seconds on speed 4.

4.  Add egg and mix for 3 seconds on speed 4.

5.  Add flour, poppy seeds, baking powder and lemon juice.  Mix for 20 seconds on speed 5.  Scrape down and mix for a further 5 seconds on speed 5.

Spoon teaspoonfuls onto lined baking trays and bake in the oven for 15-20 minutes, until golden.

Enjoy!

Friday, March 9, 2012

Chicken & Broken Pasta Soup


Chicken & Broken Pasta Soup

For me, nothing says "Get Well Soon" like a bowl of chicken noodle soup.  A close second would be dry Premium crackers and flat lemonade, which was my Mum's tummy bug remedy (she was also very adept at pouring Heinz Big Red out of a can and heating it on the stove, which I thought was pretty magical too).

As we approach soup weather (if I keep saying it, it might come true - I'll just ignore the fact that the sun in shining, there's a gorgeous blue sky and it's 27 degrees outside),  I'm converting a lot of our favourite soup recipes.  I find it's a spectacularly easy way to include masses of vegetable goodness in a meal and it's one of the simplest things to cook.  I also struggle to sit down and eat lunch, so I find that soup is souper easy (sorry, couldn't help myself) to just re-heat, throw into my favourite keepie cup and drink on the run.


Chicken & Broken Pasta Soup

(adapted from Karen Martini's Where The Heart Is)

Ingredients:-

Meatballs:-

250g chicken breast - cubed (see preparation notes)
80g fresh breadcrumbs
1/4 tsp nutmeg
3 sprigs thyme
8 springs flat leaf parsley
1 egg
1/2 tsp vegetable stock concentrate

Soup:-

1 onion
3 cloves garlic
1 stick celery
30g olive oil
1500g water
3 tsp chicken stock concentrate
1 tsp vegetable stock concentrate
1/4 savoy cabbage - shredded
150g broken spaghetti - (I snap mine into thirds)
Lemon - to serve

Preparation:-

1.  If using frozen cubed chicken breasts, defrost for approximately 20-30 minutes before using.  If using fresh chicken, cut into cubes and place into the freezer to harden for approximately 20 minutes prior to using.

2.  Pop bread into machine and process for 10 seconds on speed 6.

Method:-

Meatballs:-

1.  Place chicken into the TM bowl.  Mince the chicken by locking the lid and press the turbo button, 3-4 times, quickly each time.  (Generally, when the machine stops shuddering when you press the Turbo button, the chicken is minced.  I just check the texture after a couple of times and judge from there.)

2.  To the chicken, add breadcrumbs, nutmeg, thyme, parsley, egg and vegetable stock.  Mix for 15 seconds on speed 6.

Roll teaspoonfuls of the mixture into balls and place into the varoma dish and tray.  Set aside until you start cooking the soup.

Soup:-

1.  Place onion, garlic and celery into TM bowl.  Chop for 2 seconds on speed 7.

2.  Add olive oil and saute for 5 minutes, at 100°, on speed 1 (with the MC off).

3.  Add water, spaghetti, cabbage and stock concentrates.  Place Varoma on top and cook for for 20 minutes, on reverse, at Varoma temp, on speed 2 (with the MC off).

4.  Pour soup into thermoserver, stir through meatballs and leave for 5 minutes.

To serve:-

Ladle into bowls, squeeze a bit of lemon over the top and serve with fresh crusty bread.

Tips:-

If you have leftovers, you will find that by the following night the soup has thickened considerably.  I add a little more boiling water as I reheat it and just check the seasoning. 

Enjoy!

Monday, March 5, 2012

What's Cooking This Week

Butternut Pumpkin Macaroni & Cheese
It's been raining in Brisbane all weekend, but still manages to be humid & muggy.  With or without the humidity, rain is still rain and for me, it always spells Soup Weather. 

I love soup.  If soup were a cult religion, I'd be on board and have emptied out my bank account in a second flat.  To me, soup is the ultimate in nourishment - it's good for you, it warms you and just holding the mug of steaming hot soup makes you feel better when you're sick or sad.  It's comfort food at it's best.

So, I'm welcoming autumn back with a couple of different soups this week.  Soup also means bread (ahhhhh, bread) and I'm trying a couple of different loaves this week to accompany our soup.

I hope wherever you are, you can make a soup and join in the soup fest happening here this week!

Monday:  I'm doing a re-run of the Chicken & Broken Pasta soup I made last week.  I'm making the Allgauer Seelen (small breads from Allgau) from the Travelling With Thermomix cookbook.

Tuesday: Tuesday is our crazy afternoon, so I always try to have something that I can get ready during the day and then just finish off quickly once we get home.  It also needs to be something that's easy for the boys to eat, because they're usually struggling to make it through dinner after school and swimming.  This week we're having Butternut Pumpkin Macaroni & Cheese.

Wednesday:  One of my favourite recipes is on the menu for Wednesday - Beef Stew with Buttermilk Dumplings from the Budget Busters recipe book.  This was one of the first things I cooked in my Thermomix and I love it - it always reminds me of the kind of food my Mum would cook for dinner during winter.

Thursday:  The boys will have leftovers of the beef stew and Mr MLT & I are having Fish Cakes with a Toasted Lemon Quinoa salad.  The boyswill get the leftover fish cakes in their lunchboxes the next day, which helps me feel that their "fish servings" for the week have been ticked off.

Friday:  We're having a Navy Bean & Chicken Soup that I've been working on.  The last time we had it I used ham and it was way to salty, so I'm adjusting it with the chicken and playing with the quantities a bit.  I'm making the Cheat's Sourdough from For Food's Sake to accompany it, as the essential bread mopping tool.

Aussie Meat Pie
Saturday and Sunday:  On Saturday we'll be having leftovers, before we head off to a groovy 8th birthday disco party. 

On Sunday we're having the Aussie Meat Pie from Meat on the Menu and Frangipani Pie for afters.  The Frangipani Pie means a lot to me and, as incredibly daggy and retro as it is, I'll share the recipe with you next week. 


Happy Mixing, enjoy your week!

Brooke.

How To: Pulses and Legumes

One of the food goals I've been trying to adopt is the reduction of using canned pulses and legumes.  It's for two reasons really, the first being that the majority of canned goods now come in cans that are lined with BPA.  The second being that the cost of buying organic pulses and legumes that are in BPA free tins is ridiculously high, when compared with just buying them in an organic dried form.

I'm struggling with tomatoes and are still buying them canned.  Next time tomatoes are super cheap at the market I plan to buy up big and preserve them myself.  In the meantime, I'm trying mostly to just use fresh tomatoes, but having a couple of cans in the pantry is a great backup.  I buy the Spiral Organic brand - they're the only one I can find that are BPA free and organic.  Spiral Organic are also the importers of the canned beans I prefer to use - Eden Organic.  They're not that much more expensive than the organic canned beans you buy at Coles and Woolworths, but have the advantage of not coming in a BPA lined tin and are also cooked in kombu.  Kombu is a kelp that adds nutrients when used to cook beans and also improves their digestibility. 

However, as handy as the tinned stuff is, it isn't as good as soaking it yourself.  So, I've been trying to do a lot more soaking and cooking of pulses and legumes, as we're also trying to include more of them in our meals.  It does take a bit of foresight - obviously if they have to soak overnight it's no good thinking about it 5 minutes before you need them.  I find that this is where menu planning helps a lot! 


If you're wanting to start soaking, here's a guide on how to do it:-

1.  Soak beans in about three times their volume of warm water (i.e. one cup of beans to 3 cups of water).

2.  Leave for 12-24 hours.  (At this point, if you are soaking black beans then you need to add something to make the water acidic - either 2 tablespoons of whey or lemon juice will do the trick.)

3.  In the morning, scrape off the scum and rinse thoroughly.  The soaking water contains all the gunk expelled as the phytic acid and enzyme inhibitors are broken down.)

4.  Place in a large pot (I use a stockpot) and cover with twice their volumte of warm water.  Bring to the boil and skim off the foam. 

5.  Reduce the heat and simmer.

Cooking times vary and you need to test them to see when they're soft.  Nourishing Traditions gives a guideline that they'll take between 4 and 8 hours.  I have friends who cook their legumes for a lot less time, following The Good Cook time guidelines.  (If someone can tell me which timing is better, that would be great!  I see no need to cook something for an extra 4 hours, unless there's a nutritional benefit to doing so.)  As a general rule, kidney beans, chick peas, navy beans, soy beans take on the longer side, whereas lima beans, aduki and lentils take less.   
I'm working on a beautiful navy bean & chicken soup today, so stock up on some beans and get ready to soak!