Monday, April 15, 2013

Fruity Chocolate Slice

Fruity Chocolate Slice
Since we ventured back to school in January I've been trying a couple of different lunchbox treats, to try and ensure that the sweet stuff my boys devour during the day packs a fair whack of nutritional punch whilst also being delicious.

I love slices because they're that little bit quicker than biscuits.  If I can turn a biscuit into a slice, I will!  It's a lesson I learnt from a gorgeous friend who one of the smartest women I know when it comes to saving time.  Why spend 10 minutes shaping biscuits when I could spend that time on the phone to her!

This slice came about when we had a glut of over-ripe bananas.  Thanks to my first pregnancy, the smell of over-ripe bananas still haunts me, so they tend to get used up pretty quickly in our house and frozen once they start going ripe.  You can, of course, vary the dried fruit with whatever you'd prefer and play around with your sweetener, if you'd prefer to use something other than maple syrup.  I have used rice syrup in the place of maple syrup in this recipe, but prefer the extra caramel flavour the maple provides.

Enjoy!

Fruity Chocolate Slice
 
Ingredients:-
 
160g dried fruit (I use craisins, apricots, dates & sultanas)
80g dark chocolate
1 frozen ripe banana
150g rolled oats
150g wholemeal spelt flour
50g coconut flakes
1/2 tsp baking powder
75g rapadura or coconut sugar
80g butter
1 egg
1 tsp vanilla bean paste
65g maple syrup
40g coconut oil
 
Method:-
 

Ready to bake
Pre-heat oven to 170C (fan forced).
 
1.  Place frozen banana (broken into chunks), dried fruit & chocolate in TM bowl and turbo 2-3 times until evenly chopped. 
 
2.  Add oats, spelt, coconut, baking powder & sugar to the bowl.  Mix for 5 seconds on speed 5.
 
3.  Add remaining ingredients, except chopped fruit & chocolate, to TM bowl and mix for 10 seconds on speed 5.
 
Press into slice tray.  I usually sprinkle home-made milo on top of the slice, for a little extra chocolateyness.
 
Bake for 30 minutes, until brown.  Cool and slice into squares.  Devour!


Wednesday, April 10, 2013

April News

The April Newsletter is out - at last!!!

Jude's Fish Pie

Jude's Fish Pie & Crunchy Green Salsa
Jude Blereau is touring Australia for two reasons at the moment.  The first is to launch her greatly anticipated Baking book, which I can't wait to get my hands on.  The second reason is because she is hosting a series of Thermomix specialist classes. 

Jude is a Thermomix Ambassador, for good reasons.  The Thermomix fits into Jude's food philosophy perfectly - she's all about nutrient dense, tasty food in a realistic everyday setting.  Her classes have sold out incredibly quickly as they've been released across the country, which speaks volumes.  I've been fortunate enough to do a couple of weekend intensive courses with Jude and can promise you that two hours with her will leave you with a host of recipes you're desperate to go home and try!  If you can come along to her Thermomix classes make sure you do - but book in quickly so you don't miss out!

Two of Jude's books, Wholefood for the Family and Wholefood for Children are staples in my library.  I cook out of both of them at least once a week - they're dog eared, scrawled through, post-it noted and well loved (the way good cookbooks should be).  They're also beautiful - you can feel Jude's love come through the recipes which I know sounds corny, but once you meet Jude you'll understand what I mean.  She cooks and writes with love and compassion.

This recipe is from Wholefood for Children and is one of the ways I get fish into our weekly dinners.  I tend to make two pies at once and freeze one for the next week.  I tend to use red mullet because it's readily available in Brisbane and is a great, sustainable fish choice.

Jude's Fish Pie
(from Wholefood for Children by Jude Blereau)
 
Ingredients:-
 
2 potatoes - large diced*
100g broccoli - coarsely chopped
40g butter or ghee
2 spring onions (or 1 brown onion) - halved
2 tbsp herbs (lemon thyme, parsley or basil)
Rind of 1 lemon (be careful to only remove rind, not pith)
Large handful of seasonal green vegetables (peas, 1cm diced beans or asparagus)
80g crème fraiche or kefir cream
1/4 tsp wholegrain mustard
300g fish fillet - skin and bones removed, chopped into 3cm cubes
 
Method:-
 
Preheat oven to 190C.
 
1.  Place 500g of water in TM and place potatoes in basket.  Insert basket into TM bowl and cook at Varoma temp, for 8-10 minutes, speed 2 (until potatoes are just tender).
 
2.  Add broccoli to basket and cook for a further 4 minutes, on Varoma temp, at speed 2.  Remove basket and pour out water.
 
3.  Tip potato & broccoli into bowl, add 1 tbsp butter/ghee and roughly mash for 6 seconds on speed 4.  Set aside.
 
4.  Place onion and herbs in TM bowl.  Chop for 2 seconds on speed 7.
 
5.  Add remaining butter/ghee to bowl and sauté for 3 minutes at 100° on speed soft.
 
6.  Add remaining ingredients, season with salt & pepper.  Cook for further 1 minute at 100° on reversespeed soft.  This will allow the cream to melt and relax and all the ingredients to softly mix together.
 
Spoon the fish mixture into a shallow, ovenproof dish and top with the mashed potato.
 
Bake for 20 minutes or until golden.  Serve with green salad and enjoy!
 
*  Tips:-
 
If I know this is on the menu for the week, I tend to make it following a night where we've had mashed potatoes and broccoli.  On that night, I just add some of the broccoli to the leftover mash and reserve it to use for the pie topping the following night. 

Carrot & Beetroot Patties

Carrot & Beetroot Patties in the making
These little lunch delights are sensational - they are that perfect mix between sweet and savoury and are a great, high protein, finger food snack.

I've held off blogging the recipe because the first two times I made them we forgot to take a photo and the last time I managed to lose the photo in my great iPhone backup debacle.

So, I'll update the recipe later with a photo of the finished product, but here's the recipe in the meantime.  I'm pretty confident you guys know what a patty looks like!

They are best when they've just been cooked, but my boys happily eat them cold in lunchboxes or for afternoon tea.

You can play around with the spices if you want them to have a bit more bite, but these work well for my boys' palates.

Enjoy!

 
Carrot & Beetroot Patties

 
Ingredients:-
 
1 tsp cumin seeds
1 tsp ground cumin
1 tsp ground coriander
2cm piece peeled ginger
1 tsp turmeric
Salt
280g beetroot - roughly chopped
250g pumpkin - roughly chopped
300g carrots - roughly chopped
1/2 cup coriander
200g moong dahl
 
Coconut oil for shallow frying
 
Method:-
 
1.  Grind dahl into flour for 30 seconds on speed 9.  Set aside.
 
2.  Place ginger in TM bowl and chop for 2 seconds on speed 6.
 
3.  Add beetroot, pumpkin, carrot & coriander to bowl.  Chop for 10 seconds on speed 6, using spatula to help ensure even chopping.
 
4.  Add spices and reserved moong dahl flour.  Mix for 10 seconds on speed 6, scrape and repeat.
 
Heat frying pan over medium heat.  Add 1 tsp coconut oil and shallow fry patties for 2-3 minutes on each side (until golden brown and edges are starting to crisp).  (You will need to add extra oil for each additional batch.)
 
Set aside to cool on paper towel, for as long as you can hold yourself back from eating them.

Sunday, January 6, 2013

Cherry Ripe Gelato

Cherry Ripe Gelato
One of the things I love about summer is the fruit - the berries and cherries in particular.  When I was prepping for our Festive Flavours class, I thought I'd like to do a fresh cherry sorbet... which then evolved into a cherry ripe sorbet.

The trick with sorbet  is not to be focussed on the weight of the ice.  Each sorbet needs a different amount of ice - the amount varies on the water content of the fruit, the dryness of the ice etc.  Whilst 700g is usually a good approximate amount, it's not a hard and fast rule.  The trick is just to keep adding ice, bit by bit through the MC hole, until the sorbet stops "spitting" - once it's taken on enough ice, it will churn itself and that's the magic moment when you stop.

In the end, I made cherry ripe sorbet a couple of times but decided it worked better as a gelato, using frozen cherries - the flavour is much more intense.  You can use fresh cherries but obviously need more frozen coconut milk or ice, whichever you've got handy!


Cherry Ripe Gelato
 
 
Ingredients:-
 
300g frozen, pitted, cherries
200g frozen coconut milk
50g raw sugar
80g dark chocolate (less if you don't like it quite so rich)
1 egg white
 
Method:-
 
1.  Place sugar and chocolate in TM bowl and mill for 20 seconds on speed 10.
 
2.  Add cherries and coconut milk.  Chop for 40 seconds on speed 8, using spatula to keep fruit moving through the blades if necessary.
 
3.  Insert butterfly and add egg white.  Beat for 40 seconds on speed 4, then serve. 
 
 
Tips:-
 
When you make a gelato using frozen fruit, it tends to freeze softer so that you can keep the leftovers and just go back to them and spoon them out for later servings.  If you want it to be lovely and fluffy again, spoon the leftovers into the bowl, run them through for 20 seconds on speed 8, insert the butterfly and re-whip.
 

Sunday, December 16, 2012

The Christmas Countdown

From the absence of posts on the blog, you can tell it's been a tad crazy in our world since we arrived home from France.  The good news is that the craziness is coming to an end - for a few weeks over Christmas I plan to slow down and actually get some time to get some recipes blogged and up here for you all.

In the meantime though, we've been doing a countdown of Christmas inspiration on Facebook.  For those of you who are standing strong against the pull of social media, here's the list so far:-

Day 1 - Spiced Pecan Pie & Egg Nog Ice Cream

Day 2 - Calendula Salve

Day 3 - Gingerbread (best recipe ever!)

Day 4 - Boules de Neige

Day 5 - Sal's Smoked Salmon Dip

Day 6 - Guilt Free Chocolate Balls

Day 7 - Mangomisu

Day 8 - Fruity Pear Mince Tarts

Day 9 - Spiked Lemon Chicken Salad

Day 10 - Brie with Basil & Pesto Dressing

Day 11 - Irish Creme Liqueur

Day 12 - Jo's Tikka Salmon

Day 13 - Mulled Wine Sorbet

Day 14 - Lime, Elderflower & Mint Mojito Sorbet

Day 15 - Beetroot, Pomegranate & Pistachio Salad

Day 16 - Steamed Chocolate & Raspberry (or Cherry) Mudcakes


So, there's a nice mix in there of recipes that will hopefully help you planning your Christmas menu. 

If you're looking for ideas for Christmas presents, clever Helene at Super Kitchen Machine has compiled a list of the most popular Thermomix gift ideas.  If you find yourself with a little Christmas workshop production line happening send us photos - we'd love to see what your mixing up for Christmas!

Happy Mixing,
Brooke.

Friday, October 19, 2012

Bon Voyage!

Stefan the Thermomix Spatula
My trusty Thermomix Spatula, Stefan, is setting off today for 2 weeks in France.  Stefan's been waiting for this day to come - he's just a little spatula but he has big dreams.

While in Paris this week, Stefan's fortunate enough to be taking a cooking class at his favourite chef's cooking school, Alain Ducasse's Ecole de Cuisine.  He's also swindled his way into some swanky restaurants for a nice meal or two and is then setting off to Chantilly & Champagne for a few days of r&r.

If you'd like to live vicariously through Stefan's adventures, be sure to follow along on Facebook, Instagram and Twitter (links on the sidebar).

He and his entourage will be back in early November, so until then - Bonnes Vacances!

Tuesday, October 16, 2012

Paleo Bread

Paleo Bread
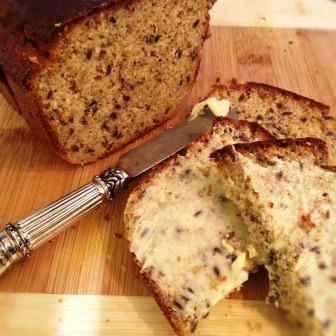
So, the Paleo diet is big in a lot of people's worlds at the moment.  I've had a number of customers who've had remarkable improvements moving away from a grain based diet.  When I saw this recipe on Elena's pantry (one of my all time favourite Gluten Free websites) I thought I'd convert it and try it out.

It's nutty and delicious.  It stays fresh and moist for days and has a really great, breadlike, consistency.  It makes a good loaf size (don't think wonder white size, think banana bread size) but is quite dense, so you only need a little.  It slices well and stands up to being filled like a sandwich style bread.

Let me know what you think, cavepeoples!


Paleo Bread
(converted from Elena's Pantry)

Ingredients:-

300g almonds
15g coconut flour
40g linseeds
1/4 tsp salt
1 1/2 tsp baking soda
5 eggs
50g coconut oil
35g honey
15g apple cider vinegar

Method:-

1.  Place almonds in TM bowl and mill for 30 seconds on speed 10.
2.  Add coconut flour, linseeds, salt & baking soda.  Mix for 5 seconds on speed 5.
3.  Add remainder of ingredients and mix for 15 seconds on speed 3.

Pour into a lined, small loaf tin (mine measures 10 x 20cm) and bake on 180C for 45 minutes (or until a toothpick comes out cleanly).


Tuesday, October 2, 2012

What's Cooking This Week

It's been a while between menu planning posts.  We're still eating every day - my children aren't starving, I promise!

The beauty of having a fridge full of pastes and stock concentrates is that on the really busy days, I can just pull something out of the freezer, identify what type and cut of meat it is and then decide on the fly what we'll do with it later.  As long as I stock up on fruit & vegetables at the market each Sunday, we cope just fine.

That said, I don't like the fly by the seat of your pants style of cooking anywhere near as much as I like menu planning.  It feels less chaotic and generally ensures there's more variety in our meals.  It also increases my recipe repertoire because I'll make sure I'm trying at least one new recipe every week.

So, I'm making the most of school holidays and actually doing a few menu plans at once.  I tend to keep my menu plans and shopping lists and recycle them, adding a couple of changes here and there.  I store them organised by season, so when next winter comes around I can pull out this year's plans and re-use them.  It's incredibly anal I know, but I'm a fan of anything that saves time and repetition!

 
What's Cooking This Week
 
Monday:-  Last night we had the Thermomix Roadshow and I went to see Jules & Grace update us on all that's happening in the Thermomix world.  Before I left, I made Hedgehogs (from the Lunchbox booklet) and made a quick tomato sauce out of diced tomatoes, herbs, tomato paste & vegetable paste.  It was a winner apparently because there were no leftovers to be found when I got home!
 

Tuesday:-  I'm using up some leftover lamb from a roast on the weekend by making Aush.  I'm also cooking some extras today, making some Mint & Coriander chutney, Bindi Balls, Carrott & Beetroot patties, Cranberry Slice and gingerbread cookies.

Wednesday:-  We're having Quirky Cooking's Chicken with 40 Cloves of Garlic, mashed potatoes and greens.  To follow we're having a coconut sago pudding I tried last week and just want to make a few changes to.

Thursday:-  My favourite fish dish, the Fragrant Fish Curry adapted from Jude Blereau.

Friday:-  I'm out at a demo on Friday night, so thought I'd make Annabel Langbein's Lamb, Rosemary & Apple sausage rolls as converted by Iron Chef Shellie in the afternoon for Mr WFK & my boys to enjoy with some steamed veg for dinner.

Saturday & Sunday:-  We're out celebrating on Saturday night which will be a welcome relief, given I've got a cooking class on Saturday afternoon.  On Sunday we're having some friends over so I'm making the Beef Stir Fry from In The Mix - super easy and makes a huge quantity.  It's also really delicious, which is probably the most important thing!

Whatever you're cooking this week, I hope it's delicious.  For those on school holidays, enjoy. 

Happy Mixing!

Wednesday, September 26, 2012

Spelt & Kefir Pancakes

Spelt & Kefir Pancakes
My favourite pancakes of all time are Bill Granger's Ricotta Hotcakes.  They serve them with lashings of honeycomb butter - it's the stuff breakfast dreams are made of.  My second favourite pancakes are the Banana and Blueberry Buttermilk pancakes which are almost as delicious. 

The problem with both of these recipes is that they don't have enough nutritional oomph in them for me to make them as a school morning breakfast.  My boys tend not to eat a lot during the day, so I need to make sure the meals either side are nutrient dense. 

Enter these spelt & kefir pancakes which are an adaption of a recipe from beautiful Brenda Fawdon at Mondo Organics.  (Brenda's class, Wholefood Breakfasts, is a fabulous grounding for delicious, nutritious breakfasts and staples.  If you're a Brisbane resident, check out Mondo's cooking class program and pop along to the next class.)

These pancakes aren't quite Bill's hotcakes but they are still entirely delicious and have the added bonus of containing a little more substance to get everyone through the day! 


Spelt & Kefir Pancakes
(adapted from a recipe by Brenda Fawdon at Mondo Organics)
 
Ingredients:-
 
140g spelt grain (or 190g buckwheat grain)*
1/2 tsp sea salt
1/2 tsp baking powder
45g rapadura sugar
3 eggs, separated
200g kefir cultured milk*
2 tbsp ghee or coconut oil (for frying)
 
Method:-
 
Preparation:-
 
Mill your grain for 1 minute on speed 9.  Set aside.
 
To Cook:-
 
1.  Firstly, beat your egg whites to a stiff peak.  Make sure you bowl is squeaky clean and dry.  Insert butterfly, add egg whites and whip for 2-3 minutes on speed 4 with the MC removed.  Gently pour out and set egg whites aside (or switch to your second bowl!).
 
Fold in the egg whites
2.  Add flour, salt, sugar and baking powder.  Mix for 5 seconds on speed 5.
 
3.  Add milk and egg yolks.  Mix for 3 seconds on speed 5 until mixutre is just combined.
 
4.  Gently fold in egg whites, using spatula to incorporate.


5.  Heat a pan over medium heat and add a teaspoon of ghee (or your preferred oil).  Fry 1/4 cupfuls of mixture and top with banana, maple syrup and cinnamon.
 
6.  Feed the sacrifical "first pancake in the pan" to the dog who's been licking the mixture out of the dishwasher for the past 5 minutes.
 
 
Tips:-
 
Kefir grains can be purchased online or from organic supermarkets/markets.  Kefir has a wider range of good bacteria than yoghurt does, so I try to use at least a cupful of kefir a day whether it be in smoothies or baking. 
More?
If you don't have any kefir with which to culture your milk of choice, you can use buttermilk and still get that lovely light fluffy texture to them. Alternatively, use whatever milk substitute you want (rice, almond, coconut milk) but just be prepared for a flatter, denser result.

If you use buckwheat grain rather than spelt, you'll need to use 250g of liquid.  If you don't have spelt or buckwheat grain, it's fine to use equal amounts of spelt or buckwheat flour.


Tuesday, September 25, 2012

Broccoli & Roasted Apple Soup

Broccoli & Roasted Apple Soup
Our branch is running a competition for consultants at the moment, encouraging them to convert any recipe from delicious and upload it onto the Recipe Community.  At the November branch meeting everyone's bringing their dish along and we're all voting on the best dishes, Masterchef style.

I can't actually enter, but thought I'd get the ball rolling by converting this soup for yesterday's team meeting.  I did a dry run of it on Sunday night and used 3 large apples, which was 1 apple too many (much to Mr WFK's amazement - yes there IS such a thing as too many apples in a dish!). 

I tweaked the recipe a little yesterday and it was far better with a bit less apple and with chicken stock, rather than vegetable stock.  I think it will be a great soup served cold in summer.  Let me know what you think!

 
Broccoli & Roasted Apple Soup
(converted from delicious Sept 2011)
 
Ingredients:-
 
1 bunch sage
2 large Granny Smith apples
60g olive oil (or 30g olive oil and 30g ghee)*
5 thyme sprigs
300g broccoli
1100g water
200g feta, to serve
40g salted butter
 
Method:-
 
Preparation:-
 
1.  Pre-heat the oven to 200ºC and line a baking tray with paper.*

2.  Place the apples on the baking tray and drizzle with 30g olive oil. Season with salt & pepper and top with thyme sprigs and 1 tbs chopped sage. Bake for 20 minutes or until the apples are tender and collapsed.
 
3.  Place 1/2 the sage leaves into TM bowl and chop for 2 seconds on speed 6.  Set aside.
 
To Cook:-
 
1. Place broccoli in TM bowl and chop for 2 seconds on speed 5.
 
2.  Add oil or ghee and saute for 3 minutes at 100º on speed soft.
 
3.  Add remainder of chopped sage, roasted apples, chicken stock and water.  Cook for 20 minutes at 100º on speed 1.
 
4.  When finished, blend the soup by slowly turning the dial from soft speed to speed 10 (take about 30 seconds to do this).  Then continue to blend on speed 10 for 30 seconds.
 
Sage Butter:-
 
1.  While the soup is in it's last few minutes of cooking, melt the butter over a medium heat pan.  Add the remainder of the sage leaves (whole) and cook for 2-3 minutes until the butter begins to brown.
 
To Serve:-
 
Ladle soup into bowls, top with crumbled feta and sage butter.  Serve with hot crusty bread!
 
 
Tips:-
 
I knew I was turning the oven on to make bread to serve with the soup, so I was happy to bake the apples in the oven.  If you don't want to use your oven, you could simply quarter the apples and steam them in the Varoma over 500g of water for 15 minutes.
 
Over the past year I've done a mountain of research into Ayurvedic medicine and have incorporated a number of their philosophies into my daily cooking practices.  At the base of it, the message is "eat whole foods that are as pure as possible" so it really speaks to my philosophy about food. 
 
One of the changes I've made though is to use ghee as my oil of choice, wherever possible (we're not talking ghee that you buy at the supermarket - ghee that you've made yourself, the key being "the better the butter, the better the ghee").  There's a lot of nutritional benefits to using ghee, but like everything - you'll use whatever works best for you.  If you see ghee used in my recipes, you can just use whatever oil of choice works for you (just don't ever tell me it's margarine or I'll have to beat you a block of butter!).


Wednesday, August 29, 2012

Watermelon, Feta & Balsamic

The stack, the salad & the sorbet
Things have been very quiet on the blog, I know.  I apologise, profusely.  It's happened for a couple of reasons, mainly being that for the past month I have lived and breathed our school fair.  The big day finally came and went on Sunday and only now, 3 days later, am I starting to feel some relief from it being over.

On Sunday night, after the big Fair day, I finished prepping for our consultant version of the Devil of A Cookbook class which is travelling it's way around the country with author of the cookbook, Fiona Hoskins, exciting many Thermomix customers. 

Having the consultant class was a great opportunity for us to see and taste all the dishes which Fiona prepares (much more professionally) at the class.  It's going to be such a fabulous class - some really simple, but elegant, dishes which taste delicious!  If you haven't yet booked for the Brisbane classes, do so - they'll really help you add to your Thermomix repertoire.

I was presenting Fiona's Watermelon & Feta Salad recipe, which is really lovely.  At the customer class, she also showcases a few different ways you can use those same ingredients, including an entree version and a canape version.  Not wanting our fabulous consultants to miss out, I thought I'd do the same.

It meant that I needed to do a balsamic reduction and also make some balsamic jelly.  As I was making them, I decided that I wanted to do something different with the jelly and form it into little pearls.  It was, of course, super easy with the aid of the Thermomix, so here are both of those simple recipes, if you'd like to try them out at any time.  They go very well with watermelon & feta!!!

Caramelised Balsamic Reduction
 
Ingredients:-
 
500g balsamic vinegar
50g raw sugar, honey or other sweetener
 
Method:-
 
Balsamic Glaze
1.  Place ingredients into TM bowl.  Cook for 25 minutes at Varoma temperature on speed 2, with MC removed and basket on top of the lid instead.
 
2.  After 25 minutes, check the consistency - it needs to coat the back of a spoon (you should be able to run your finger through it and it will stick to your finger but not run off, and your finger will leave a path through the vinegar on the spoon.)  If it needs longer, give it another 3 minutes and check again.
 
3.  Decant into a squeezy bottle, ready to dazzle people with your squeezy bottle patterns!
 
(See, I told you it was simple!)
 
Tips:-
 
You can use whatever sweetener you like.  You can reduce the quantity, just keep a 10:1 ratio of vinegar to sweetener.
 
Balsamic Vinegar Pearls
(adapted from Molecular Recipes)
 
Ingredients:-
 
100g balsamic vinegar
1.5g agar agar
Vegetable oil
 
Method:-
 
Nice cold glass of oil anyone?
1.  Firstly, fill the tallest glass you have with vegetable oil and place it in the freezer.  It needs to chill for at least 30 minutes.
 
2.  Pour balsamic into TM and cook for 1 minute at 100° on speed 1.  Add agar agar and dissolve, by stirring for 20 seconds on speed 1.
 
The finished pearls
3.  When the temperature cools to 50°, take the oil out of the freezer and fill a syringe with the balsamic mixture.  Slowly push droplets out of the syringe and let them drop into the oil (the more mixture you expel, the bigger the pearl).  As the droplets sink through the oil, they will set and become firm.  Continue until you have as many as you want - you need to work relatively quickly because the mixture will start to set and get harder to push through the syringe.
 
Tips:-
 
Next time I make these, I'm going to use 1g of agar agar, not 1.5g.  They were very firm, and I'd like to see if I could make them a little softer.
 
If you don't use a tall enough glass, there won't be enough time for them to set - I used a beer glass and it worked a treat.


Monday, August 13, 2012

Delicious Lemon Slice

Lemon Slice
I love lemons.  I love coconut.  I love butter.  Therefore, this recipe conversion was a no brainer for me - it was always going to happen, it was just a matter of finding the time.  Enter citrus season, which thankfully forced my hand.
There's nothing fancy or difficult about this slice.  You've no doubt had it before, though sometimes with a rasberry or strawberry jam as the filling instead of the lemon curd.  It is just good old fashioned Nanna style baking, at it's best!

I use the EDC recipe for the lemon curd, though you'll find a couple of variations around for it, so just use one which is to your taste.  I always an the juice of an extra lemon because I love it quite tart.


Lemon Slice
(adapted from an old recipe handwritten by my beautiful Nanna)


Ingredients:-

Base:-

125g butter
160g caster sugar (or raw sugar milled for 3 seconds on speed 10)
250g SR flour
1 egg

Curd:-
1 quantity of EDC lemon curd

Topping:-
1 egg white
95g caster sugar (or raw sugar milled for 3 seconds on speed 10)
120g dessicated coconut

Method:-

Curd:-

Make lemon curd as per EDC recipe instructions.  You will need about half the quantity for this recipe so allow half to cool and bottle the remaining half straight away.

Base:-

Preheat oven to 160°C (Fan Forced).

1.  Place butter in TM bowl and melt for 4 minutes, 50° on speed 2.

2.  Add sugar, SR flour and egg and mix for 10 seconds on speed 4.

3.  Press into slice tray.  Bake 15-17 minutes, until golden.

Topping:-

1.  Add egg white, sugar and coconut to the TM bowl.  Mix on reverse for 20 seconds on speed 4.

Assembly:-

Spread lemon curd over the cooked base and then top with the coconut mixture.  Return to the oven and bake for 20 minutes, or until coconut golden.

Tuesday, July 31, 2012

Choc Chip Banana & Quinoa Cake

Choc Chip, Banana & Quinoa Cake
I've waxed lyrical previously about how much I love Quinoa.  It seems that quinoa's everywhere lately though - open any food magazine, look at a cafe menu and it seems that that quinoa is the new black.  For good reason too, it's good stuff!

This recipe evolved in some recent baking experiments.  I've been making a conscious effort of late to replace wheat with spelt in my baking but on this particular day I'd run out of spelt, so I decided to try this one out with quinoa instead.

The result is, if I do say so myself, super delicious!  It is beautiful served warm - the banana and the chocolate just ooze and are perfect for this cooler weather.  It has been featuring regularly in my boys lunchboxes and they love it, so it gets big kids thumbs up as well.


Choc Chip, Banana & Quinoa Cake


Ingredients:-

*  110g quinoa (see tips)
*  130g rapadura sugar
*  125g rolled oats
*  1/2 tsp bi-carb
*  2 ripe bananas
*  1 egg
*  60g butter
*  1 tsp vanilla essence
*  150g choc chips (see tips)

Method:-

Pre-heat your oven to 170C fan-forced.

1.  Mill your quinoa for 1 minute on speed 9.  (If you put a piece of paper towel under the MC before you start milling you find that you stop getting bits of quinoa fly out while you're grinding.)

2.  Add the rapadura, rolled oats and bi-carb to the TM bowl.  Mix together for 5 seconds on speed 4.  Set the dry ingredients aside.

3.  Place banana, egg, butter and vanilla essence to the TM bowl.  Mix together for 20 seconds on speed 5.

4.  Add dry ingredients to the bowl and mix for 5 seconds on speed 4.  Scrape down, add choc chips and mix on reverse, for 3 seconds on speed 4.

Pour into a lined 27cm x 16cm slice tray and bake for 25 minutes.

Tips:-

Quinoa needs to be rinsed before you use it.  I soak my quinoa overnight with a bit of whey in the water to make them easier to digest and then dehydrate it in my oven and store it dried.  If you can't be bothered with all that (or just want to make the slice straight away), then you can rinse the quinoa, dry it well and grind it into a paste, rather than a flour.  If you do this you need to reduce the butter content by 10-20g to allow for the additional moisture in the mixture.

I am fortunate enough that I can get organic choc chips through my dry goods co-op (in Brisbane you can order them from Santos Trading).  I also love using the Lindt Couverture chocolate buttons which are available at good delis.  In Brisbane, one of the easiest places to get them is at the Zone Fresh gourmet deli at Windsor.

Monday, July 16, 2012

What's Cooking This Week

School holidays are almost over for us - we've got one more day left of bliss and then it's back to reality.  While we've been on holidays there's been no menu planning happening at our place - it's the only time I can fly by the seat of my pants and not feel like my entire week is disorganised (mind you, it does sometimes mean breakfast for dinner, but that's okay).

However, we're back to planning this week.  I go away on Friday for a few days (to the Hunter Valley with fellow Thermomixers for what promises to be a sensationally fun weekend) so I've planned some nice easy staples to get Mr WFK and the boys through.

I also recently started learning about Ayurvedic foods after attending a class with the very lovely Brenda Fawdon at Mondo Organics.  I've got a couple of dishes I'm working on converting this week including a hummus using chana dahl, a mung bean falafel and a mung bean dahl.  Don't roll your eyes at me just yet - they were all actually really very delicious and perfect for cold wintery days!

So, here's what you'll find happening in my wholefoodie kitchen this week:-

Monday:  Baking:  Bread, Apricot & Oatmeal Cookies, Chocolate Coconut Cupcakes, Cheese & Rocket Scones and Carrot Slice.  Dinner:  Be Sampi Curry from the Taste of Asia cookbook (in preparation for our Asian consultant cooking class this week).

Tuesday:  Coconut & Prawn Curry (yes, I know, I'm *STILL* working on it!)

Wednesday:  One of my husband's favourites, Moroccan Lamb Tagine.

Thursday:  Delicious Creamy Tikka Salmon from Quirky Cooking which utilises the amazing tikka paste from the Fast and Easy Indian cookbook.

Friday:  Mr WFK will start off his weekend of cooking with his signature Thermomix dish, spaghetti.

Saturday & Sunday:  The boys' weekend will continue with two of their favourite soups:  Quirky Cooking's Chicken & Brown Rice soup and then our new favourite pumpkin soup recipe as featured in this month's Newsletter.

Happy mixing everyone,
Brooke.

Wednesday, July 11, 2012

Decadent Chocolate & Hazelnut Brownies

Chocolate & Hazelnut Brownies
I've been on a bit of a baking bent of late.  Obviously, even when we're super busy, dinner still happens.  The thing that falls by the wayside when I'm busy though is baking and I find that if I go for more than a week or two without it, I really miss it (the actual process of it, not just the deliciousness that results!).

So when I had some spare hours at the beginning of the school holidays, we went to town making some truly decadent and delicious delights.

Top of the list were these brownies, which are an adaption of an old Family Circle recipe.  The original recipe called for the more traditional walnut ingredient but, given they aren't top of my Favourite Nuts list, I substituted with hazelnuts.


Chocolate & Hazelnut Brownies
(adapted from Family Circle)


Ingredients:-

250g dark chocolate
150g butter
175 rapadura sugar (milled for 6 seconds on speed 9)
3 eggs, beaten lightly
1/2 tsp vanilla bean paste
150g hazelnuts (toasted, with skins removed - see tip)
75g spelt flour

Method:-

Preheat oven to  160° (Fan Forced).

1.  Place chocolate in TM bowl and grate for 5 seconds on speed 8.

2.  Add butter and melt for 3 minutes, on 50° on speed 2.

3.  Add sugar, eggs and vanilla bean paste and mix for 10 seconds on speed 2.

4.  Add hazelnuts and flour and mix for 8 seconds on speed 4.

Pour into a 20cm square tin and bake for 40 minutes.

Tips:-


To easily remove the skins from the hazelnuts pop them into an old tea towel when you remove them from the over.  Rub the nuts in the tea towel and the skins come off easily (you just might need to take the tea towel outside to shake it clean!).

Tuesday, July 10, 2012

Cook-A-Long with Brooke-A-Long: Edition 9

Yoghurt, Strawberries & Coulis
I've been asked a few times lately about how I make yoghurt.  My boys go through at least 1kg of yoghurt a week, so it's well worth my time making the yoghurt rather than buying it.

In terms of cost effectiveness, the yoghurt I was buying was the Jalna Organic Biodynamic Natural, which is about $6 per kg.  I now make double that quantity for almost half the price.  I buy 2L of organic milk through a diary co-op and, factoring in the price of my culture, 2kg of yoghurt costs me around $4.

There is a recipe in the EDC which works perfectly fine for a lot of people.  I didn't want to use powdered milk though, so I scanned a few recipes and in the end, this is the one that works best for us.

Try it out and see how you go.  If you need to source good culture, I've used both Cheeselinks and Nick's and been very happy with their service and their culture.  The one we use all the time now is the Type C abY Yoghurt starter from Cheeselinks.   If you don't use a dried culture, you need to use a very good quality live organic yoghurt - the Jalna one is okay, but either Barambah or Paris Creek is better.


Yoghurt

Ingredients:-

2L organic full cream milk

1/8 tsp yoghurt culture or 1/2 cup yoghurt starter

Method:-

1.  Measure milk into TM bowl and cook for 15 minutes at 80° on speed 2.  This kills off any unwanted bacteria.

2.  Allow the milk to cool to 37°.  (Warning:  this can take forever!!!  Don't think to yourself "oooh, we're out of yoghurt, I'll just make some now before I go to bed" at 10pm one evening, unless you're not planning on going to bed until midnight.)

3.  Once the milk has cooled, add in the starter culture or yoghurt.  Mix through for 1 minute at 37° on speed 1.

Pour into Thermoserver and leave, undisturbed, for at least 12 hours before placing into the fridge.  As tempting as it is to open it up and see how it's going, it's really important not to disturb it for as long as possible.
I personally find the easiest way to set my yoghurt is to put my Thermoserver into my oven and turn the oven on to 35°. 

I tend to leave it in there for about 15 hours and then place it into the fridge.  If your oven doesn't go that low, try putting it into an esky and pack it down with towels - the key to getting it to set well is to keep it warm for as long as possible.

Tips:-

Once set, if you want to sweeten your yoghurt the easiest way to do that is by making some fruit coulis and stirring it through. 

I use the recipe from the EDC (reducing the sugar content), bottle the coulis and just add it as a sauce to the yoghurt when I'm looking for an extra hit of sweetness.

To make labna (a yoghurt cheese similar in texture to cream cheese), strain your yoghurt through a cheesecloth.  The longer you leave it to strain, the thicker it will become.  It's beautiful then used as a dip base and in cheese balls.

Chicken Stock Paste

Someone recently put a post on the Recipe Index page asking for the recipe for chicken stock paste. 

I'm happy to share with you the recipe as adapted by beautiful Jo Whitton at Quirky Cooking from one of my favourite Thermomix cookbooks, My Way Of Cooking.  You'll also find the recipe on the Thermomix app alongside lots of other fabulous recipes from that cookbook.

Chicken Stock Paste
(from Quirky Cooking)


Ingredients:-

300g raw chicken
300g vegies (leek, onion, shallots, carrot, garlic, celery etc.)
Few sprigs herbs (rosemary, thyme, parsley)
150g coarse sea salt
1 bay leaf
50g white wine
1 clove
5 coriander seeds

Method:-

1.  Mince chicken (from frozen cubes - or fresh but placed in the freezer for 10 minutes to harden up) by locking the lid and pressing the turbo button a couple of times.  It's minced when the machine no longer shakes.

2.  Add vegies and herbs and chop on speed 6 until all finely chopped, using spatula to push it into the blades.

3.  Add remainder of ingredients. Cook for 20 mins, Varoma temp, speed 2, with simmering basket on top instead of cap.

4.  Replace cap and blend 1 minute, speed 10.

Use 1 tsp in 500g water for chicken stock.

Farewell MLT, hello WholeFoodie Kitchen!

So, My Little Thermomix is no more.  It's been a cute name, a good name, but it's time to thank it for it's services and send it on it's way. 

As Thermomixes become more and more popular, Thermomix has to obviously take great care with brand association.  Given that any Tom, Dick or Harry can have a blog and put recipes up for unsuspecting bystanders to try out, Thermomix needs to know that the recipes which carry it's name are tried, tested and true (and we all know that I'm guilty of leaving ingredients or recipe steps out as I transcribe from my trusty notebook to the blog).

Contrary to popular opinion, I'm not bothered by the change.  It's a fair call on Thermomix's behalf and, apart from the inconvenience of having to get new business cards printed, it's not been a issue for me.  It was fun to see everyone's name suggestions on Facebook - unfortunately ximomreht (Thermomix spelt backwards) did not get my vote (much to Jackie's despair - he thought it was the best suggestion!).

In the end, I settled on WholeFoodie Kitchen for a couple of reasons but mostly because it most accurately describes what cooking is about in our kitchen - whole food that is delicious and special. 

I bought my Thermomix for all the cool cheffy tricks, not realising just how much time it would save me with lunch, breakfast & dinner.  I've gone through a huge learning curve in the last eighteen months and learnt enormous amounts about different foods and their benefits.  I've learnt to soak grains and nuts, I make our yoghurt, I have sourdough bread down pat, am at the markets at 6am every Sunday, have about 4 different co-ops to source all our food requirements and only go to the shops for toilet paper and cleaning stuff.

I feel that I've combined all the knowledge I've gained about traditional eating and wholefoods and joined it with all the foodie knowledge & habits I already had.  The result is, I'm a bit of a WholeFoodie.  (A friend described me as a Yippy: a yuppy who's pretending to be a hippy.  Hilarious, but Yippy Kitchen just didn't have the same ring to it!).

Therefore, WholeFoodie Kitchen seemed to me the obvious choice for my new name.  I love my Thermomix and the journey that our family is making with it.  I love taking wholefood recipes and putting a little bit of foodie love into them or, alternatively, taking foodie recipes and putting a bit of wholefood goodness into them. 

I'm always so grateful when people tell me they've tried something and love it.  Sharing recipes and tips on how the Thermomix can help everyone is really rewarding - there's a lot to be gained from sharing a bit of WholeFoodie love!!!

xx